Intro
I am going to show you how to build a simple blog using data from airtable. You can clone the airtable base here. You can clone the webflow template here. In the webflow template the homepage is the list of blogs and the post page is where the user will end up once they click in to a blog post to read it. The webflow template already has the bindings set up, this guide will explain what they do so you can create your own projects!
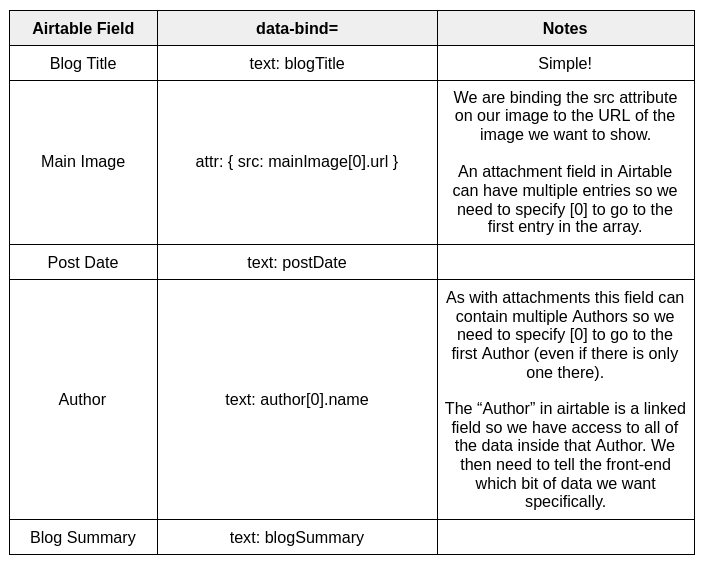
Before we get started you need to note that all airtable fields are converted to camelCase in our app. So Blog Posts => blogPosts when you reference it on your front-end.
You do not need to delete any of the fields in webflow or edit their content. If a text field has “Your Blog Title Here” this is just to show you where we will put the blog title. The content will be replaced with your Airtable data. In your own sites you can put dummy content here or leave them blank.
In your airtable block you can grab the code you need from the docs section, or you can use the code from our mock blog posts:
<script>
var bbConfig = {
baseUrl: "https://cdn.baseboosters.com/8e15c673861b40a1/v1.json",
tables: ["blogPosts","authors","categories"],
recordsPerPage: 10
};
</script>

<script defer src="https://cdn.baseboosters.com/ajax/1.1/bbpublish.min.js"></script>
<link rel="stylesheet" href="https://cdn.baseboosters.com/css/1.1/bbpublish.css">
This code needs to be placed inside the <head> tag of your website.
bbConfig contains a few things you can change. The baseUrl is self explanatory but the tables array is something you can edit - the first table in this list is the one we will paginate so in my case I want to display my blog posts and paginate them so that’s the first one! Below that you can see recordsPerPage, which is hopefully self explanatory. When we paginate your list you can change this and alter how many items are shown on each page.
Wiring it up!
To get your airtable data into your website you need to understand how the data binding works. It looks complicated at first but once you understand the simple rules it's easy to follow! My Blog has 2 pages - a home page with the list of blogs and a “post” page. The Post page is similar to a webflow CMS collection page. We build it once and then use it for all of our blog posts. More on that later!
My individual blog post that I want repeated on the page for each Blog Post in Airtable has the class “Blog Post” and the parent list is called “Blog Post List”. I need to add a simple binding to “Blog Post List” to tell our script where the repeated elements will be. In the div block settings for “Blog Post List” I need to add a new custom attribute:
data-bind=”foreach: blogPosts”
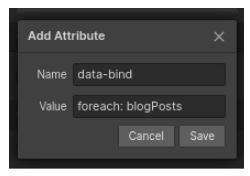
Note the space after the colon and the camelCase on blogPosts!
Now inside my blog post I need to set up the individual bindings. The first ones are listed below along with some notes to explain what is happening.
For each blog post it is possible to have multiple categories! We need an additional binding here to tell our script there could be multiple outputs, nested within the blog post. Just like we did on the blog post we need to find the parent item, in this case it has the class “Categories List” so find that and add this:
data-bind=”foreach: categories”
Now that we have that on the individual category item we can bind the airtable field as before:

Next up we need to let the user click the See More button to take them to an individual blog post. This is accomplished by setting the data-bind attribute like this:
data-bind=”attr: {href: 'post'+recordUrl}”
All we are doing here is telling the button to go to the page (post) we designed in webflow. The individual post ID is appended to the URL as a parameter. When your user navigates to the individual blog plage they will see:
/post?bbrec=recXaIenXFpSXmfWF
As you can see, the button has taken them to your page and passed in the baseboosters ID for your record. Easy!
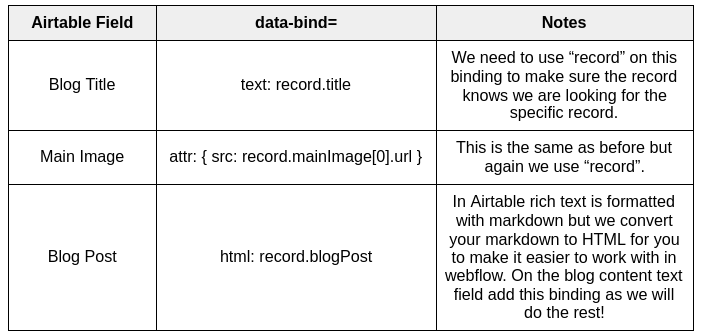
Just as before we now need to map the correct fields to your webflow individual blog post page. This works like this:
Pagination!
Setting up pagination is really easy! On your main page (in my case the homepage, where my list of blogs is) make sure you have recordsPerPage set in the config and your main table is the first one listed in the tables array.
Your pagination should be set up using link blocks, like this:
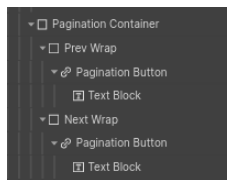
Each button is actually a link block, and each of those is inside a parent div. It looks like this:

Here are the bindings you need to add:

Loading
When you first load up your page you don't want the visitor to see your template data even for a split second. Luckily we have a couple of tricks to help you with that.
bb-show-when-loaded
If you add this class to any element and then set that element to display-none we will remove the class as soon as your data is loaded into your page.
bb-hide-when-loaded
If you add this class to any element we will set it to display none once the data is loaded. You might like to create a loading spinner in a div with a higher z-position than the rest of your page for example.